Seven years ago I started a blog. I didn’t know what I was doing.
Domain name? Hosting? WordPress or Blogger? Theme? Logo? Huh!?!
What I did know is that I was searching for some type of outlet – somewhere to dump all my new mom thoughts, trials and tribulations in one spot. An online diary if you will.
It took over a month for me to figure out how to start my first blog. You read that right. AN ENTIRE MONTH. That has nothing to do with writing any content and everything to do with my fear of anything to do with coding and SEO and graphics and all the other stuff that comes along with a blog!
What I would have done for someone to come up along side me and say “Hiya, here’s exactly what you need to do to start a blog. Every single thing. I’ll just hold your hand and walk you through it all.
So that is exactly what I am going to be for you today. I am going to hold the heck out of your hand and help you take the giant leap of faith into the blogging world.
Here’s a little secret no one wants to tell you (except I’m totally going to tell you): you’re going to LOVE IT! You’re going to love blogging once you get used to the ins and outs of the blogging world and your’re going to become totally addicted to all the possibilities a blog opens up.
Step-by-step, let’s walk you through setting up your blog so your can dominate!
1) Start an account with WORDPRESS.ORG
I am a huge fan of WordPress and really regret that I didn’t start my blog with them earlier. They have so many capabilities and handy plug-ins that my previous blog (on Blogger) didn’t have. I have already seen a significant boost in traffic simply thanks to their SEO plug-in (called Yoast…more on that another time).
To being the “Start a Blog” process, download WordPress (hit the blue Download WordPress button in the top righthand corner of WordPress.org).
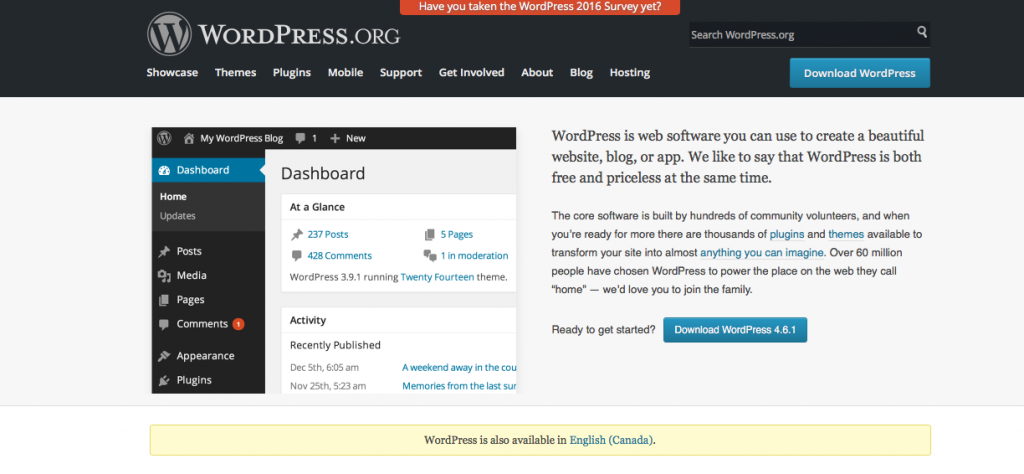
WordPress also has some of the prettiest templates out there (in fact, they might have a bit of template overload!). I’m not huge on saying your blog needs to be designed to look a certain way or you won’t get traffic, but I am big on liking the way your blog looks and the way it portrays you!
2) Choose A DOMAIN NAME
This is the most important step: choosing a blog name. It’s a tricky thing because you need to choose a name that suits your style but is also available as a URL for purchase.
Of course, 7 years ago, I chose ‘Sleeping Is For Losers’ on a whim and it worked out, but if you’re having trouble coming up with a good name let me throw a suggestion out there: why not just use your own first and last name? (Or throw your middle name in if you choose). You can still make a blog header with a different name, but if you use your own name you have the freedom to change up your blog name or use your new blog as a portfolio for other work/services you provide. [Also, you won’t be stuck with a name you hate in a year!].
If you’re having trouble figuring out what to call your blog, why not try out a free domain name generator (like Name Mesh)!
3) Register your DOMAIN NAME
Once you have the perfect name, you need to register it so no one else steals it.
You have 2 options here:
+ Register your name with the same company you choose to host your blog (this is the simplest option), OR
+ Purchase your domain name separately from your hosting package. I have my domain name registered through one site and my website hosted separately. It has worked for me but (full disclosure) it adds a layer of work for you. If you do want to register with a separate site, for whatever reason, I suggest going with Name Cheap (as the name suggests, they’re very inexpensive!).
All that being said, my recommendation, as a new blogger or new website owner, is to keep all of this tech stuff ridiculously simple! If you’re like me, and just want to get this part over with so you can start writing and creating, then I highly suggest buying your name with Bluehost (who I also highly recommend for hosting).
[Bonus, they’ll give you your domain name for free when you sign up for a year of hosting (which you totally should – it’s the best value by far!). Total win-win!]
4) Sign up for HOSTING
Hosting is where your blog LIVES.
There are free options for starting your blog (ones where you don’t have to pay for hosting) but here’s the catch: you don’t own your blog if you have hosting on a “free” site. In fact, if those free sites decided to shut down tomorrow your blog would be gone. You don’t have any support if you don’t pay for hosting – that’s a big issue if there’s something wrong with your blog and you can’t fix it yourself! That’s why hosting is so important – not only does it allow you to do fun things with your blog (like have fasting loading speeds and accessibility) but it also gives you some security that your content is unlikely to disappear like it may on a free “non-hosted” site.
You also want to pick a trustworthy host that others are also using, because your host provides the support you need if there is an issue with your blog OR if your blog gets overloaded with traffic (which we all totally want!).
I’ve used a few different hosts in my time, but since you’re just starting out my suggestion is to begin with Bluehost. Not only will you get your domain name for free (YEAH!) but a lot of other bloggers utilize their services so you are in good company and can rest assured that they know what they’re doing. Starting with them is a great idea because they have worked with other new bloggers just like you and are already attuned to the issues that may arise!
5) Set up HOSTING
I don’t want you to be intimidated with the amount of things you have to do here so I’m going to keep it SUPER simple. Now that you’re ready to start your blog lets just moter through the set-up and get going! I’m going to walk you through it step by step!
+ Click this link to be redirected to Bluehost and click the “GET STARTED NOW” button.
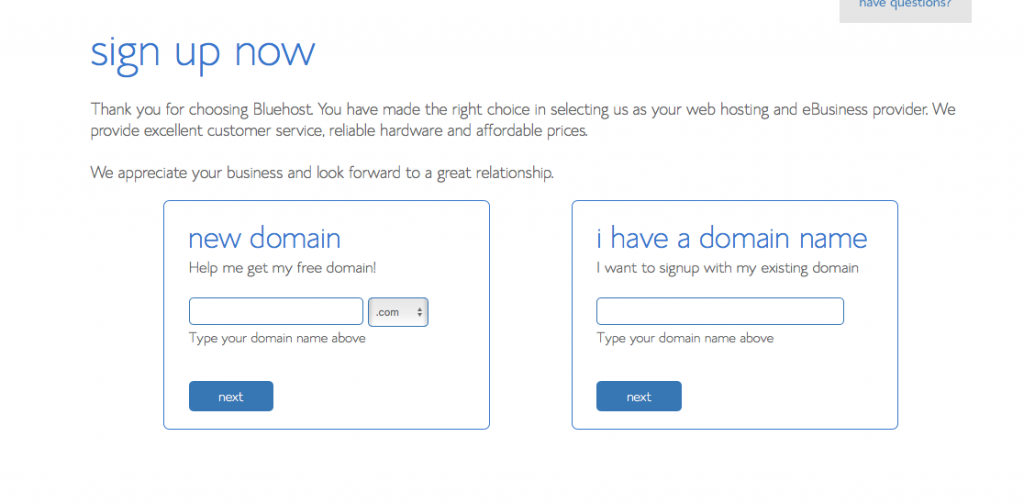
+ Register your domain name with Bluehost, enter it under the “new domain” box and click “next.”
+ Enter all of your account and contact information.
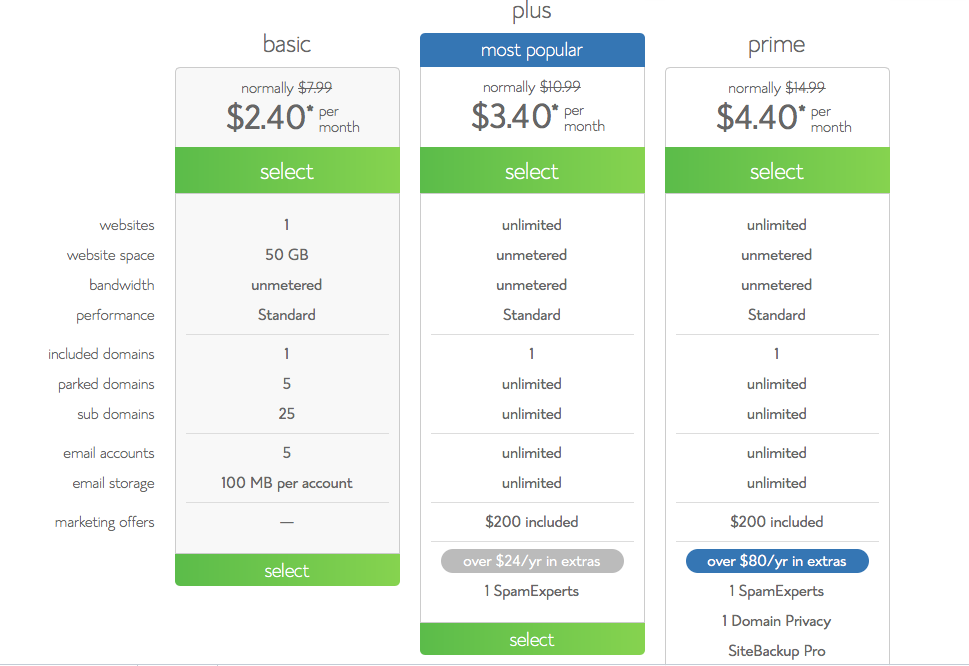
+ Move on to the “package information” section and choose the monthly rate of your choice (look at them all so you can make the best choice for you!). If you’re just starting out, the “Basic” package will totally work out fine & it’s the most cost effective!
+ Enter your billing information, read & agree to the service agreements, and hit “next.”
+ Click “complete.”
Woooo! You’re set up with Bluehost! Now for a few more steps and we are done!
+ Create your Bluehost account password.
+ Once you have a password, log into your account (this is so exciting! It’s all happening!)
+ You should see your account dashboard. The first thing I want you to do is click the “INSTALL WORDPRESS” button at the bottom of the screen.
+ On the WordPress Installation screen, click “Install.” Then hit “show advanced options.”
+ Name your site (you can change it later if you need to), create a username for the WordPress install, and create a WordPress login password. Make sure that “automatically create a new database for this installation” and “I have read the terms and conditions…” are checked too. Click “Install Now.”
+ If the bar at the top of the next screen turns green, you’ve installed WordPress. SUCCESS!.
+ Check your email. You should now have an email in there that includes your website URL, your WordPress admin login URL, and your WordPress login username. Save this email!!!! (Trust me!). Hit the Admin URL and enter your username and password when prompted.
+ The page you now are on is an awesome one because it is going to hold your hand and show you everything you need to know to start using WordPress.
+ Go ahead and open a new screen and log into your WordPress account. Houston, we have takeoff! Your blogging life is about to begin:)
6) Choose A THEME
You did it! Yay!!! Now you want to make your blog pretty, right? In order to do that, you will need to choose a theme. Your theme will determine many of the visual aspects of my blog– my background, colors, fonts, navigation bar, and the social media buttons in my header are all part of my theme.
WordPress is phenominal because it has so many great, free templates and (my preference) some amazing paid templates that make your blog look really legit.
To find the free templates, go to your WordPress dashboard (make sure you’re logged in) and hit “Appearance -> Themes”.
If you’d like to upload a new theme, click on “Add New” right near Themes. This will bring up a grid of all the available FREE themes. Once you find a theme that you like, click “install” and then click “activate” to make it your main theme. Seriously, that simple!
7) LEVEL UP
If you want to really look legit and level up your blog right away, I hightly suggest paying for a template that you love!
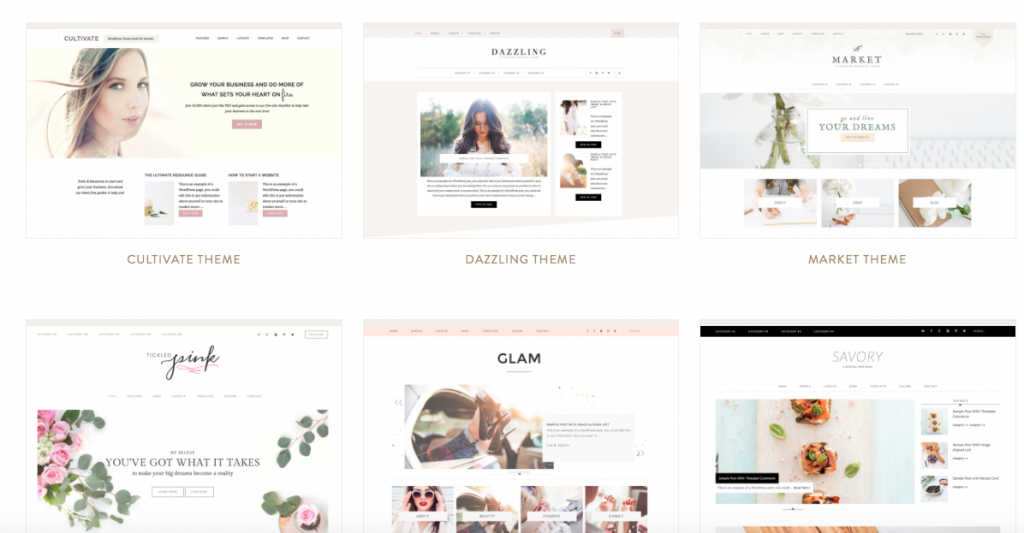
The marketplace is full of really beautifyl blog templates but the truth is that I don’t love any templates more than the ones created by Restored316. They are so feminine, yet clean and readable. I use the Darling Theme for my blog, but I literally could have chosen any of them!
Once you really start getting into blogging and see the power of having a blog, you’ll also realize the benefit of having a personalized template and if I had to go back and start a blog all over again I would have spent a bit of money and invested in a template that I love right away!
*
Now, you’re done!! That’s it, that’s all!!!! Seriously.
It’s so easy (and really cost effective) to begin your online blog or business. Once you have hosting and a template out of the way, you can start blogging and that, my friends, is totally worth it!
*This post contains affiliate links. Please see my disclosure policy for more details*
[…] The Definitive Guide to Starting a Blog – if you are thinking about starting a blog but are the least bit intimidated, this is the place to start! I will hold your hand and walk you through the exact steps you need to take to start your own blog that can help you reach your goals! […]